Unlike my previous layouts I am attempting to do as much as possible above the board, rather than under. So, for example, I have tested to used point motors which are under, rather than the Cobalt and Tortoise motors on the previous layout which were under. I also want to try to avoid lifting the boards and to avoid track joins by using short pieces that can be shifted rather than elaborate cross-board joins that kept getting out of alignment.
Related to this I built and under frame on which the final boards would fit and spent several hours (or so it seemed) sifting through timber at B&Q looking for straight pieces.

To avoid the boards getting knocked out of alignment I have bolted 8 of the legs (of which there are about 24) to the concrete floor, through the carpet tiles. I have, however, bought another pack of brackets with the intention of securing 3 or 4 more to avoid having to have quite so much cross bracing which is preventing some of the trolleys underneath from moving. All the cabinets underneath the frame are on wheels. Though I still have to address the lack of space for spare timber in the revised garage plan.
Once again I went to CW Berry along the way in Leyland to buy 9mm Marine Play for the baseboards, though this frayed more than I would have liked when cutting.
There will be another, 7th, board later, but probably not for 2 or 3 years, God willing.
I had looked at CW Berry’s timber for the under frame as it is so much cheaper than B%Q (about a third of the price I think). But their timber is badly stored and so much is warped. So I also went to Savoy Timber in Preston, on recommendation, and found them both very helpful and that they store their timber in a much better fashion. I bought some stuff there, but as Berry’s is so much nearer I went back and looked again and after a long search found enough straight ones to do the job, though a few were not very straight and were only used for short pieces.
The timber is 3in x 1in nominal, which is 68mm x 20mm in practice. The reason for 3in rather than the more traditional 2in is because I wanted some depth under the top of the boards for scenic features. Eventually there will be track on inclines, but not for the first 2 or 3 phases of the track laying.
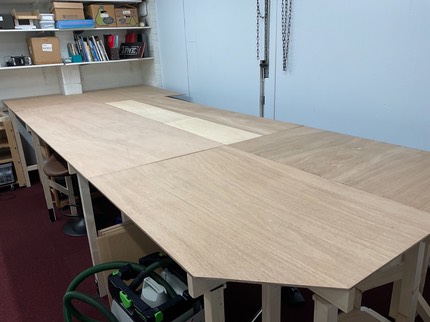
Here is the completed set of 6 baseboards with rough cuts made for a river and short stretch of canal which are to be incorporated in the final version.
I painted it all for three reasons, first to try to stop splintering at the edges where the cut has been against the grain. Secondly, to give an earth coloured background to the textures that will be laid on top, though the paint is more shiny than I expected. Thirdly, to give a good look to the edge of the boards.

I still need to bolt the boards to make sure they stay together, and also some way to ensure they don’t get pushed sideways on the frame, but prior to that a bit of sanding is required in the bits that abut. I have also bought some perspex sheet which I will cut ready to attach the the outside edges to protect they layout from passing people and overhanging stomachs.
Then I will take a pause whilst investigating 3D printing of buildings, wiring holders, and such like. After that I will finish the shelving and trolleys and bring in the remaining stuff that was moved out before the garages was emptied for the revelling of the floor.
Then, finally, I can start on track, wiring and so on.